ATC turned card.

OK I've turned this ATC into a card for Adele - I don't think she would have a use for and ATC but I'll let her know she can deconstruct it and frame the ATC to hang on her wall in the lounge. (hehehe I might really just tell her to do that - of course she'll just laugh at me!)

Stamps used: All ISC see post below
inks used: see post below
techniques used: see post below: and the orange ribbon isn't as scarry in real day life.
Posted by Picasa

Swedish Collage...fin!

Oh here's my "swedish collage" - see previous post.

Wow it was fun to do - I think of it as the best friend that you have that no one can understand why you're friends with them - these friends are often the ones you can really depend on when it really matters - and I'm assuming this card will be the same.

It was great to get stuck in to that stash box!

Stamps used: Hero Arts clear alphabet sets - O,Q,Y,U,K.
inks used: colorbox ruby, versafine black, adirondack wild plum handmade background papers
techniques used:The shoe and hand bag are stickers on acetate that were coloured in with "sakura glaze" pens by my dear little K and the rest is just a bit of ripping, a bit of glueing, a bit of inking edges, a bit of punching and 'hey presto' you're there! I haven't used any buttons or staples though so it may need adding to - after all "more is more".


Posted by Picasa

Some thing new to try

Oooh I think I'm going to give this a go swedish collage challenge go and check it out - looks like a fun way to use up papers and get blood flowing to a different part of my brain. hehehe. Have until 1st October to join in - so one week eek!

"There are several key points which regularly appear in swedish collage style stamping...

* the shape of the card is SQUARE


* a bold mix of PATTERN PAPERS is used


* CHIPBOARD titles (in any language!), BUTTONS and/or STAPLES are often incorporated into the design


* COLOR COLOR COLOR the more color the better! (this is not your regular vintage style collage frequently done in the states! Ban the brown!)"

My Budding stamp artist...


My Darling Daughter (8) has been joining in this week and has made her own atc using resist (see the sponging over the embossed flowers) she is loving the skeleton leaves and the colour blue at the moment and chose this 7gypsies paper and sticker from the mess that is our craft room. She was so proud that we've decided that it should be blogged - so here it is.

iscc13 atc resist techniques

The challenge this week at Innovative stamp creations was to make 2-4 ATC's with a resist technique. Now I was lucky as I have just done two this week with this technique so here they are...

This was inspired by “Adele” my very cool step-sister-in-law who is now a published writer and who strove to achieve her dream through all the “poo hooing” of the people around her.
Resist method
Ink crackle background in versamark and clear emboss.
Sponge a mixture of dye inks over (I’ve used red pepper caramel and a little stonewashed adirondacks)
Then I ironed (with paper towel) the background to remove the clear emboss
Stamped “fly” and used black emboss powder
Stamped pen nib on scrap card black embossed and added colour with sponge
Stamped “wings” and sentiments in black onto scrap and coloured with spongeing
Then layered it all up.
.
.
.
.
.
.
.
.
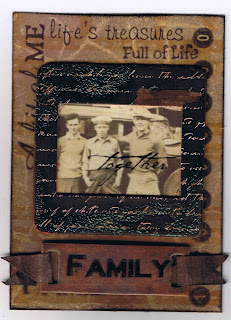
Resist methodThis next one was done for the "men" theme at inkurable blogspot - go have a look and join in - there is so much inspiration over there.
On gloss cardstock I stamped the torn paper stamp with versamark and then sponged with esspresso and maybe a little caramel (or butterscotch) for some depth. I then stamped the film strip four times down the length of the card with sepia archival ink. Sentiments are in black archival ink – I used second generation stamping to avoid too much ink from pooling on the gloss and causing the stamp to slip if I pressed too hard.
The slide mount was found at the bottom of the sticker drawer and sanded back, a little plastic peeled back a little, inked with ginger and then some "fire adobe” emboss powder sprinkled over two corners and melted then scratched a little of it off and inked again (it used to be very black and white)
The bottom peice was a chipboard sticker which was sanded back – it had a much easier surface this one. I inked with browns and blacks until I liked it. I stamped the "family" with black but it just soaked in so I put some brilliance white overtop and tried again. The ribbons are a strip of white card, inked black and brown then corners cut and taped on. I like how they look like old dark leather.
Resist method
This last one was done with a cuttle bug and wax. I think that I scraped candle wax into the cuttlebug first then gave it a bit of a blast with the heat tool, squished it. Sponged and spread esspresso and caramel ink (with plastic) over the top and then stamped with archival ink. Now I don't think it's finished but my dh does, so I'll add to it when just the right thing pops up. I think it needs a long tall key or key hole to go with the opening of creative doors and beginning of artistic journeys... (Edit - I have made the keys from chip board diecuts from my local and I like it - I'll add a photo this evening - let me know what you think...)

Edit - well my dh also prefers it with the keys now that he doesn't have to imagine it. I like the middle picture with the keys on the left so you can see more of the resisting

All stamps used on these ATC's were from Innovative Stamp Creations : About me, ATC elements and art4framesII. go and check them out here

ISCC12 - scketch challenge

Here it is for Melissa because I did give a tease earlier today...
This is for the blog challenge at innovative stamp creations (See my previous post for a pic of that gorgeous rubber)

I will take some more pics in the daylight tomorrow so that you can see the butterflyies standing out (the scanner is a bit squashy) and the colour's a little better - the scanner really shows the white in behind the colours.

Stamps used:
Innovative stamp creations - about me and art4framesII

inks used:
memento dandelion and tangelo; adirondack red pepper and stonewashed; versafine onyx black

techniques used:
I cut the strips from white cardstock and ripped the ends, then attached them to the card. I started with the red dandelion head then orange then yellow and sponged a little colour into the gaps. Then I wiped the black card clean (it is a little shiny). Next I stamped the butterflies randomlyish to be flying from the bottom left to the top right. (wipe clean black again). The sentiment was a solid background stamp with black embossed "thankful" matted onto black which matched the card.
Instead of brads/eyelets I stamped butterflies with black on manilla card and colourd dtp with stonewashed; they are attached with a little folded peice of card to make them float on an angle above the card.

This was the third draft of this card - I learned that if you stamp the paper up and then cut and split it your brain doesn't like the gaps if you've cut a butterfly down the middle and spread the gap and that if you stamp and then rip the bottom and try to adhere to the card it looks funny with gaps on the top and bottom or patterns on an angle (looked like a bad wallpaper job). But this one I liked!

here's that new rubber...


Does it get any better than this? Not much I don't think!

Another Wooo Hooo

I am so excited - I won a prize of five stickywords sheets on the inkurable stampers blogspot challenge for August which was to make a card using flowers - I entered the card that I had made for a sick relative - (who is a bit better now). I sugest that you look in - there are many many inspiring cards , atc's and even scrapped layouts made by some of the talented people out in stamping land.

Why not make an entry - this months theme is men.

Here's the details from the blog...
"HOW TO PARTICIPATE!
Participating is easy! Simply create a project of any type - e.g card, ATC, scrapbook page, OTP item, altered art etc - based on the theme for that month. Your project must use at least one stamp to be eligible, and must have been made in the same month that the challenge is run.
Upload your creation to your blog with a link to Inkurable Stampers, and leave a comment here with a direct link to your post, and then Email me a photo / scan of your entry by midnight on the last day of the month to be eligible for the prize. Don't have a blog? No worries! Just email me your pic!
Images must be no larger than 160kbs, and only one entry per person per month will be accepted.
Prizes will be allocated by random draw, from my 6 favourite entries this month."

Woo Hoooooooo

The postie has been and gone while I was out and left me the most wonderful present, well it was 1/3 present from Betsy at Innovative stamp Creations for participating in one of the challenges on their blog and 2/3 present from me - cause I'm like that! No part of it actually came from the postie - but I do love the work they do here!

Anyway, you should check out the blog - it's not about being the "best" it's all about doing your own best and finding what it is that you can do - The design teams work is really, truely, inspirational too, but I also like to follow the links and see what people just like me are doing and seeing how fabulous stampers are (they really are the best kinds of people)

I'm going to add some photos of my new rubber soon (before I spend hours cutting and mounting it - which by the way I do by following the method I found here on "Lisa Vollraths - GoMakeSomething" site. Got my Vinyl from "spotlight" - it was the plastic table cloth stuff - I've seen it at "plastic box" too - works brilliantly.

FEEDJIT Live Traffic Feed

statcounter